In this article, I will introduce the approach we use at ThinkR for Shiny applications we design. This is a relatively strict framework but designed to simplify our life and guarantee to deliver a “prod ready” application (whether it is launched locally, on shinyserver, Rconnect or via ShinyProxy with docker). This framework simplifies application maintenance and collaborative work.
Edit: Better read the recent version here: https://rtask.thinkr.fr/building-a-shiny-app-as-a-package/
A Shiny application in a package R
Table of Contents
A R library model for a Shiny application
In this article, I will present an approach, which is still in progress. We have built ShinyApps for a long time now, thus we considered our approach to be mature enough to freeze the current state and detail documentation for the present article. However, as for any work in progress, we would be delighted to hear your comments and your suggestions to improve the template.
This approach has been designed step by step, through the Shiny projects that have been entrusted to us by our customers, learning from our mistakes, seeking to optimize our time and the debugging phases of the code.
To understand the rest of my remarks, it is better to:
- Know the R language
- Know Shiny’s basics
- Know how to create a package, if you don’t know yet, don’t run away, I explain it clearly here, even using a video there
- Know how to create a shinyModule. It is super important! see here
My first “big” shiny application, for professional use, dates from 2015. In concrete terms, getting your hands back in today would be a ordeal, and I must be the only one on earth who can maintain it (I exaggerate but you understand the idea). Thanks to the template proposed here, the approach is much clearer and more comfortable.
Everything is Package
As soon as you make your first “copy-paste”, you must create a function. As soon as you do a function, you have to create a package (knowing that a package is versioned via git).
Designing a Shiny application is one thing, making sure it is easily deployable and maintainable is something else. In R, as soon as you want a well-defined and sustainable work, you have to create a package. We will therefore design a package with certain rules, especially designed for the development of Shiny applications.
This remains a package, thus, any function you code must be placed in the R folder. You need nice functions, a devtools_history.R, markdown, {roxygen2}, etc. cf. our article “creating an R package in 5 steps”.
Do not code your Shiny application too early
This aspect is not detailed in the article, but you should avoid starting with a Shiny application, without really knowing where you are going. Make sure you have a clean Rmd file, that works well. It must use the functions you already integrated in your package; functions with documentation and unit tests. Once you have it, once you have built a workflow that runs well (validated by your customer), you can start to integrate it all in a Shiny application.
App in a package
The folder structure of a package is something pretty fixed, and there is no specific location for Shiny applications. This is why we will use the inst folder. Everything that is placed in this folder will end up on the user’s machine, at the root of the package, in its installation folder. This is the only place where you can drop exotic files and documents (if they must reach the end user of the package), such as a Shiny application.
In our case, the Shiny application in the inst folder will be an empty shell. The application content will be created as functions in the R folder. First, we will design two separated functions, one that will return the UI part of the app and another one, the server part. Thus, in the R folder, we create a file app_ui.R that contains the function definition app_ui…
#' @import shiny
app_ui <- function() {
  fluidPage(
    titlePanel("My Awesome Shiny App"),
   ...
    )
}
…and a file app_server.R which contains the server part.
#' @import shiny
#' @importFrom graphics hist
#' @importFrom stats rnorm
#'
app_server <- function(input, output,session) {
...
  output$tableau <- DT::renderDT({data()})
}
Then, in the inst/app folder we will design one file server.R and another ui.R, this is the expected format, for instance, for shinyApps.io and shiny server. Rstudio will even display the ‘run app‘ button, when these files are open.
These files are rather light with these instructions:
ui.R
shinytemplate::app_ui()server.R
shinytemplate::app_serverOf course you should replace
shinytemplateby the name of your package.
Then define a function called run_app() (but you can call it as you want), which will launch the application :
run_app <- function() {
  shinyApp(ui = app_ui(), server = app_server)
}
This function is the one that can be called by the user of your package to launch the application, or it will be launched by a Docker container designed for Shinyproxy.
Testing your application
When developing a Shiny application, it may take a little time to visualize the impact of a change. The application itself can take a long time to set up. Often, you have to go around the application (upload a file, click here, there and there) to make the correction appear or check a bug… It’s long, too long. In addition, we are encouraging you to do this in a package template, which requires to add the compilation/installation time after each modification!
But no worries ,we have a solution to all of this 🙂 Indeed, we will rarely install the package and launch the application run_app() that we defined… it takes too long.
Instead, we suggest you create a script in inst/dev/run_dev.R. Here is a script proposal:
.rs.api.documentSaveAll() # closes and saves all open files
suppressWarnings(lapply(paste('package:', names(sessionInfo()$otherPkgs), sep = ""), detach, character.only = TRUE, unload = TRUE))# detach all  packages
rm(list = ls(all.names = TRUE))# clean environneent
devtools::document('.') # create NAMESPACE and man
devtools::load_all('.') # load package
options(app.prod = FALSE) # TRUE = production mode, FALSE = development mode
shiny::runApp('inst/app') # run the main app
A click on the source button, or a “Ctrl + A” then “Ctrl +Enter”, and you get, in a few seconds, your updated application under your eyes. Not bad, is it?
Modules everywhere, anytime
Nobody wants to maintain UI and server parts of several hundreds/thousands lines, it is unmanageable:
- You cannot work one it with several programmers
- Concepts cannot be easily reused from one application to another
- It is necessary to be extremely rigorous on the arrangement of
reactive,observe, etc. - It is very complicated to have an overview of the app
- etc
The solution is to use shinymodules. It changes life. There is a “before and an after” using this feature. The idea is to define “modules”, i.e. blocks of Shiny mini applications, which will allow you to compartimentalize the features of your application. And to recall it as many times as you want in this project or in another. This is the function concept applied to Shiny applications.
Designing a ShinyModule means creating two functions, one in charge of the UI aspects, and the other in charge of the server aspects. These two functions will be defined in the same file .R. For the name of this file .R and the names of the two functions to include, we propose this nomenclature convention:
- the file names must match the function name of the module UI. It starts with
mod_, followed by the module functionality in lower case, with underscore, and ends withUI,InputorOutput- Input will be used as suffix if the module is a Input
- Output will be used as suffix if the module is a Output
- UI will be used as suffix if the module is both Input and Output
The suffix of the server function uses the name of the UI function. For instance, the file mod_import_excelUI.R would contain the two following functions:
- ui :
mod_import_excelUI - server side :
mod_import_excel
Each function must be documented, using the appropriate @import and @importFrom. Both functions will be shared on the same documentation page. #' @rdname allows this.
Finally, it is essential to have as minimalist example for the use of each module.
Here is, for instance, the content of the file mod_csv_fileInput.R
#' @title   mod_csv_fileInput and mod_csv_file
#' @description  A shiny Module that imports csv file
#'
#' @param id shiny id
#' @param label fileInput label
#' @importFrom stringr str_detect
#' @export
#' library(shiny)
#' library(DT)
#' if (interactive()){
#' ui <- fluidPage(
#'   mod_csv_fileInput("fichier"),
#' DTOutput("tableau")
#' )
#' server <- function(input, output, session) {
#'   data <- callModule(mod_csv_file,"fichier")
#'   output$tableau <- renderDT({data()})
#' }
#' shinyApp(ui, server)
#' }
mod_csv_fileInput <- function(id, label = "CSV file") {
  ns <- NS(id)
 out <-  tagList(
  ...
 out
}
#' mod_csv_file server function
#'
#' @param input internal
#' @param output internal
#' @param session internal
#'
#' @importFrom utils read.csv
#' @importFrom glue glue
#' @export
#' @rdname mod_csv_fileInput
mod_csv_file <- function(input, output, session, stringsAsFactors=TRUE) {
  userFile <- reactive({
    validate(need(input$file, message = FALSE))
    input$file
  })
  observe({
    message( glue::glue("File {userFile()$name} uploaded" ) )
  })
  dataframe <- reactive({
    read.csv(userFile()$datapath,
             header = input$heading,
             quote = input$quote,
             sep = input$sep,
             stringsAsFactors = stringsAsFactors)
  })
  output$log <- renderPrint({input$file})
  dataframe
}
Testing your modules
An advantage of working in modules is that you can test and debug each module independently. Thus, we create, for each module, a file close to run_dev.R, but which only launches the module you are working on. Here again, the filename corresponds to a precise nomenclature: run_dev + module_name + .R. Below is an example for the content of inst/dev/run_dev_mod_csv_fileInput.R
.rs.api.documentSaveAll() # close and save all open file
suppressWarnings(lapply(paste('package:', names(sessionInfo()$otherPkgs), sep = ""), detach, character.only = TRUE, unload = TRUE))
rm(list = ls(all.names = TRUE))
devtools::document('.')
devtools::load_all('.')
options(app.prod = FALSE) # TRUE = production mode, FALSE = development mode
library(shiny)
library(DT)
if (interactive()){
  ui <- fluidPage(
    mod_csv_fileInput("fichier"),
    DTOutput("tableau")
  )
  server <- function(input, output, session) {
    data <- callModule(mod_csv_file,"fichier")
    output$tableau <- renderDT({data()})
  }
  shinyApp(ui, server)
}
Manage your application with a dev version and a prod version
The idea is to use an option that we will be pass to FALSE or TRUE, to define if we want to see the application in production mode (options(app.prod = TRUE)) or in development mode (options(app.prod = FALSE))
Then, via a specific function, defined as follows:
`%||%` <- function (x, y)
{
  if (is.null(x))
    y
  else x
}
#' return `TRUE` if in `production mode`
app_prod <- function(){
  getOption( "app.prod" ) %||% TRUE
}
it is possible to show or hide some debugging message():
if (!app_prod()){message(" dev mode enabled ")}We will also use this if ( app_prod() ){ to display or not elements of a shinyModule.
To do so, we will take care of name of the elements of the tagList, with a name starting with ‘dev‘, which will not be shown when app_prod() returns TRUE
Example :
out <-  tagList(
    fileInput(ns("file"), label),
    checkboxInput(ns("heading"), "Has heading"),
    selectInput(ns("quote"), "Quote", c(
      "None" = "",
      "Double quote" = "\"",
      "Single quote" = "'"
    )),
    selectInput(ns("sep"), "Separator", c(
      "comma" = ",",
      "tabulation" = "\t",
      "semicolon" = ";"
    )),
    "dev1" = verbatimTextOutput("log")
  )
if ( app_prod() ){
   out <-   out[! (names(out) %>% str_detect("^dev"))]
}
 }
 out
Testing your code
Each element of the application is a function, which can be tested, and which have to be tested. As a reminder, usethis::use_test('function_a_tester) allows you to set up unit tests. Presently, in our {shinytemplate} package, a file tests/testthat/test-app.R contains an embryo of tests specific to Shiny applications, but the test ‘app server‘ is commented as it does not work with ShinyModules (work in progress).
The {shinytemplate} package
We developed a package that adds a Rstudio template. This will allow you to design a Rstudio project containing everything you need to build an R package specifically for a Shiny application. This template includes the different points presented above in this article.
You can install the application with the following instruction:
devtools::install_github("ThinkR-open/shinytemplate")Then choose File > New project > New Directory > R package for shiny app
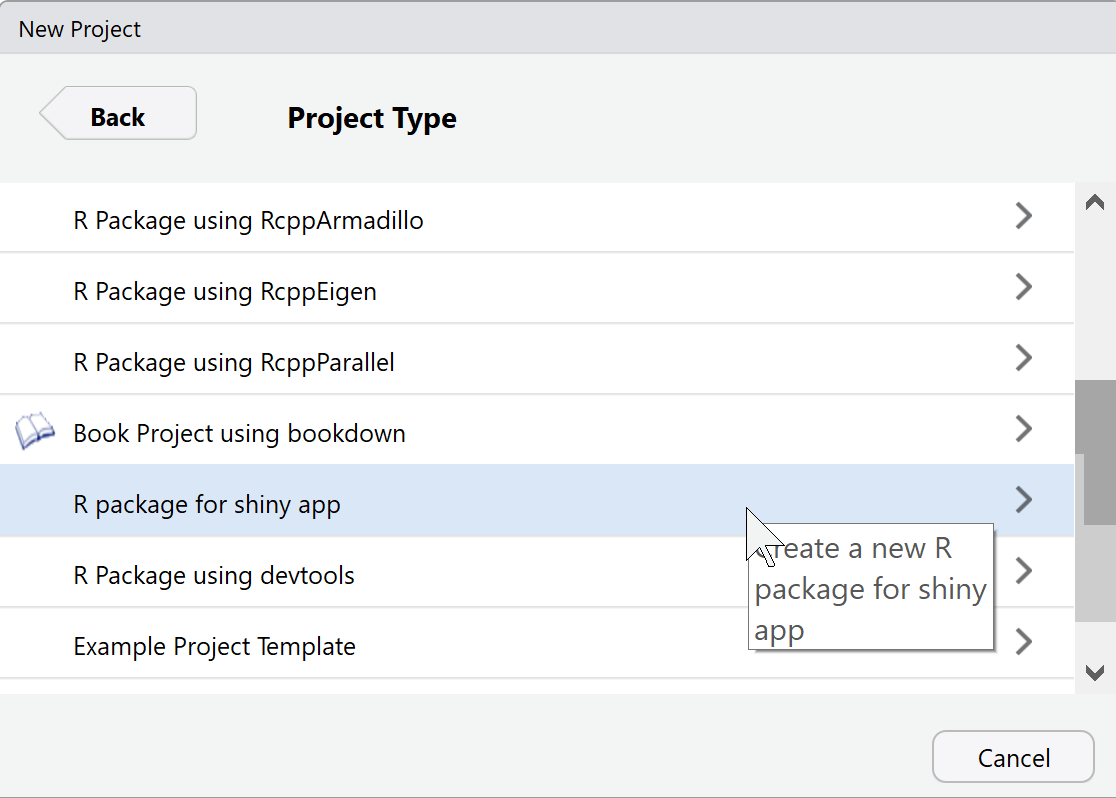
You now have a ‘blank’ template from which you can develop your application.
Feel free to comment on this article below or make your proposals on the Github page of our package {shinytemplate}